
The Florence Dress and Top pattern makes a gorgeous, versatile garment that is easy to customize, and even more fun to wear! Choose from a princess seamed or tiered skirt version, and between multiple lengths including top, tunic, above the knee, below the knee, and full maxi. There are multiple necklines and sleeve options as well. Speaking of sleeves, did you know that the Florence sleeve is interchangeable with the Sulky Perfect Tee sleeve? It's true! This provides you with even more choices for customization. There are so many reasons to love the Florence Top and Dress Pattern. But let's hear from our lovely testers on why they think it's so special:
Tricia Nguyen
I was so excited to make this week's Tester Talk pattern, the Florence Dress and top! It has so many pretty options! I decided to make 2 tanks because it has gotten quite hot in Georgia.For my 1st I went with the basic shirt length. I did add an inch to the length as personal preference. It is made with a cotton modal.
For my second I knew that I wanted another tank, but with the one tier version. I choose a Rayon Spandex that came in a bundle awhile ago. I really love how this one turned out!


Erin Knight
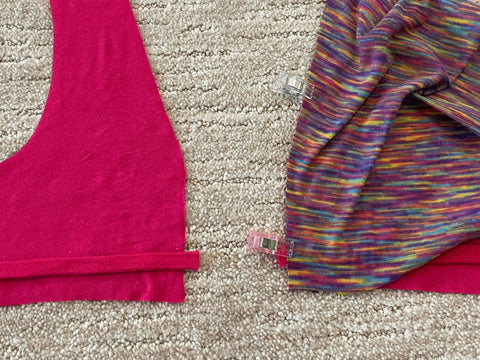
I have loved this pattern; this is my daughter’s fourth one. And the past two I have made, I added this little hack for a tie back to make it more of a grow-with-me style. By adding the tie, I can make it up a size, and it will last twice as long and still look well-fitted from the front.
To add a tie, when you are assembling the back bodice, sandwich your tie pieces in about half an inch above the bottom edge (see photo). For the tie, I used a shoelace that happened to be a perfect color match; but I have also braided the trimmed rolled edges of CL, or you could fold over and sew
your own drawstring if you don’t have one on hand. Once the bodice is assembled, I pull the cord to the outside, with the seams to the inside, and zig-zag top stitch on top of the seam allowance to add a little more stability right where your tie attaches (see other photo). You won’t see this stitching once the tie is tied. Then, assemble as written for the rest of the dress. Just be sure your ties are moved out of the way as you attach the tier(s) to the bodice.
If you try this hack out, I’d love to see a photo!
I got both of these fabrics in a bundle; space dye PRS and fuchsia RS.

Sherry Root
I love it when it turns out better than your imagination
I doubled the length of the center panel by cutting it every 2 inches and adding a 2 inch piece to keep the shape. Then gathered to fit. I did a neck facing.
Cathryn Larkin
I want to use up all these lovely scraps from a mystery box I had gotten. The Boho prints are so much fun, and perfect for this pattern!
The great thing about the tiers is you can adjust them as you like. I made mine according to the scraps I had, and utilized the optional elastic underbust. The top layer isn’t as full, and at least one layer isn’t as tall as the pattern, but works perfectly for a cute babydoll length The long bishop sleeves have two ways to finish- I chose the elastic this time. Very comfy! I hacked the v neckline- I didn’t have a long enough scrap. I used elastic instead!
First I cut a 1/4” snip at the front point. Then I used double sided sewing tape to hold the elastic to the wrong side of the neckline. It’s 1:1, so don’t stretch as you place it. I have a half inch extra elastic at both the start and finish, so it could overlap when topstitching. So tape the elastic to the neckline edge, then turn under snuggly, using clips to pin in place. Lay the front flat , and pin the elastic overlap in place. Topstitch, starting and ending st the point. Easy peasy!
Have you made one yet? Which options did you choose?
Sherrie Broussard
I am IN LOVE with my floral, flowy, fluttery sleeve Florence!! This pattern has so many options that you must check it out! This is the square neck top, which is the not too wide in the neck and not too low cut. I did a little thing to the flutter sleeves because I have been seeing so many double flutters in RTW.
I shortened the flutter sleeve by 2”, then made another sleeve 1” shorter than the new one. (look at my pic) Before sewing the sleeves on, I basted the two sleeves together at the shoulder seam and underarm seam. It was super easy with this bamboo and lightweight FT. If you’ve never used bamboo spandex(the floral in pic), you must try it! It is the ultimate soft fabric,
and from SSE of course.

Rachael Brown
This week we get to share our Florence creations! This floral spoke to me to be a tiered Florence tank, so I did another one with the added ruffle in the princess seam for a cute detail.
I love the major variety the Florence pattern offers-
- The various sleeve options (including sleeveless)
- The different length options with the tiered pattern style
- 3 neckline options (Crew, V, Square scoop)
- Option to line the bodice for a clean finish instead of bands
- Ability to add cute details within the princess seams, or colorblock
- Sizing from toddler up through adult 10x!
And that's it for this week's SSE Tester's Talk for the fabulous Florence Top and Dress Pattern! Tune in next week for our next pattern discussion!
1 comment
Sherrie Broussard
What beautiful makes! Can’t wait to make more. Thanks for doing this to inspire us!